How To Unclog Anything!
Secrets of a master service plumber.
Copyright 2005 By: Drainfield.us
This Book has been provided by www.drainfield.us stop by and see us for something new.
Copyright 2005 FCPlumbing
This book was written to explain the way that plumbing drain systems work and how to solve the problems many people have with them.
You will be taken step by step through the process that a plumber would use to solve the problem. Starting with the simplest method first, then working through until the problem is solved.
No one wants to deal with the nasty mess of drains. That is why the plumber makes so much money fixing them. But with a little help you can save the money for something you want and decrease the cost of your home ownership.
Join me on a journey through the drains in your home and use the handy diagnosis charts to solve the problem. Then use the tips to prevent them from happening so soon again.
Not many tools are needed and you probably already have most of them.
So let’s get started. Look through the table of contents and find the drain you are having a problem with and turn the pages to the solution.
Happy Draining.
Jeff
Table Of Contents
Clogged Kitchen Sink 2
Clogged Toilet 8
Clogged Tub / Shower 9
Clogged Vanity sink 15
Clogged Laundry Drain 18
Clogged Floor Drain 14
Clogged A C Drain 11
1
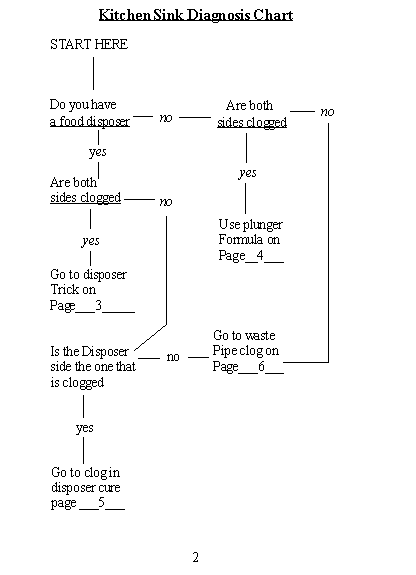
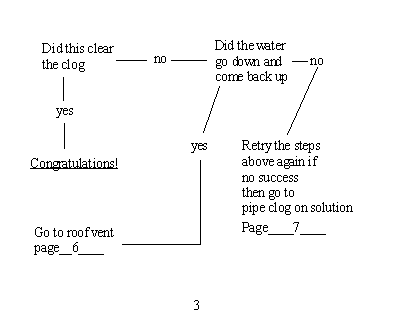
Disposer Trick
1. Start by looking under the sink to make sure that
the pipes connected to the sink are in good shape.
No leaks or loose connections
2. Fill the sink with water about one third way. The
water will rise in both sides
3. Use the rubber stopper that came with the disposer to plug the side of the sink that DOES NOT have the disposer in it.
4. Hold the stopper in tightly with one hand while you turn on the disposer with the other. Let it run for about 10 seconds. The disposer will turn it’s self into a water pump and force a localized clog down the line.
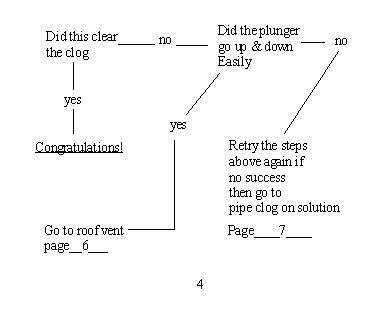
Plunger Formula
I call it the plunger formula because a plunger is a very powerful tool if used properly but almost worthless if not used properly.
1. Start by looking under the sink to make sure that the pipes connected to the sink are in good shape. No leaks or loose connections
2. Fill the sink with water about one third way. The water will rise in both sides if there is two.
3. If there are two sides place a stopper in one side of the sink and hold it closed.4. You may need a helper to keep the stopper held tight while you center the plunger on the other drain and use a very rapid up and down motion.
Disposer Cure
This is a technique that helps to clear the disposer of debris that the cutting blades in the disposer just can’t reach.
1. If the disposer is slowly draining wait for it to drain, if not bail out the water standing in the sink.
2. Next dump about one tray of ice into the disposer turn on the water into that sink and turn on the disposer.
3. The ice will get between the blades and the side wall of the disposer and clear any small peelings.
5
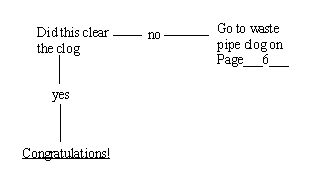
Waste Pipe Clog
This is a little more advanced solution. The pipes under the sink can sometimes be over filled with solids and swell in the pipe causing a clog.
1. Bail out any standing water in the sink.
2. Make a drawing or take a picture of the pipe configuration under the sink.
3. With a bucket under it. Loosen the two nuts that hold the dip part of the trap in place.
4. There was some water that you could not bail out of the sink drains. If it is still standing in the drains continue one piece at a time to remove the next piece till you find the clog in one of them. If all the water drains out when you take the dip off of the trap remove the next piece toward the wall and use a small hand snake to run down this pipe, usually no more than five feet.
5. Reassemble the parts under the sink just as you took them out with the dip of the trap going in last.
6. While checking for leaks underneath turn on the water and check the drain.
7. If this did not solve the problem go back to the chart on page one and go through it again.
6
Roof vent solution
This is the most advanced and dangerous of the solutions. Although you can rent the equipment be sure you are up to the task before trying it. At this point don’t feel you would be paying a professional for nothing because this can be dangerous and do damage to your home.
1. Rent a motorized cannister snake with at least 75' of 3/8" cable in it.
2. Take the machine and a power cord on the roof to the plumbing vent pipe over the fixture.
3. Pull out and feed cable down the vent untill it no longer pushes easily.
4. Turn on the motor and continue to feed the cable do not force the cable down the line.
5. Have a helper go to the nearest large plumbing vent and listen for the cable it will start out faint then become loud once you break through the clog.
6. Leave the cable in the line and have your helper turn on the water if it backs up you may need to push and pull the cable in the line to break up the clog.
7. Once it clears pull the cable out while water runs.
7
Toilet
The toilet clog is one of the most common and hated clogs. There are just a few things you can do to clear them.
1. A plunger placed directly over the drain hole then make quick firm plunges about 2 per second to force the clog down the line.
If that doesn’t work.
2. Most hardware and home centers carry a toilet auger for a fraction of the cost of a service call. Pull the handle back through the body. Place the bent end into the opening of the drain. Firmly press the handle into the body of the auger while turning the handle clockwise. Continue to press and turn until the handle reaches the body to completely clear the trap way. If the water went down test flush the toilet. If there is a lot of paper in the drain you may need to repeat this process several times.
If that doesn’t work.
3. You may need help and a little plumbing experience for the final option for clearing a toilet. First dip out the tank and bowl as much as possible, then disconnect the water supply and remove the bolts holding the toilet to the floor. Take the toilet outside and use a garden hose and your auger backwards to blow the clog out from the bottom of the toilet. Reinstall the toilet.
8

9
Trap Plunge
A plunger is a very powerful tool if used properly but almost worthless if not used properly.
1.Fill the shower area with water about one inch or so.
2. Center the plunger on the drain and use a very rapid up and down motion.
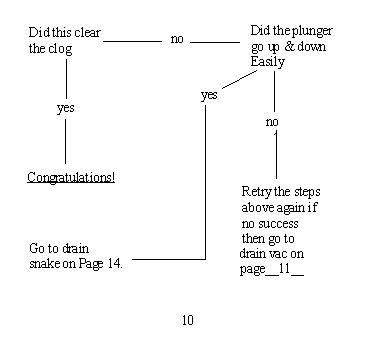
Drain Vac
This is exactly what it sounds like. Sometimes the simplest way to get out a clog is to pull it out.
1. Use a vacuum that is approved for water.
2. Put the sucking end over the drain that is clogged or even down in it surrounded by a wet rag.
3. Turn on the vacuum and hopefully pull out the clog.
If this step did not work go to pipe snake on page14.
11
Overflow Clog
There a few possibilities for clearing a clog with the overflow. It is a straight shot down to the trap in most cases.
1. The face plate of the overflow is usually held on by two screws. Remove them and put them where they won’t fall into the drain.
2. Next slowly remove the overflow cover some are just a plate but some have a brass rod attached.
3. On some models there is a large spring attached to the end of the brass rod. If too much hair attaches to this spring it will make the clog. If so clean off the hair and replace the overflow.
4. Take an old rag or wash cloth and wet it tuck it into the hole that is now where the overflow was and hold it tight.
5. Using very rapid movements take your plunger and plunge the drain in the bottom of the tub.
6. The rag keeps all of your plunger pressure from being shot up the overflow.
7. If this did not clear the drain go to drain snake on page 14
12
Toe Tap Clear
Toe tap refers to the style of drain where by opening and closing the drain can be done with a toe while standing in the tub.
1. The top chrome cover on the toe tap will unscrew counter clockwise. Remove it.
2. Below the cap you will see a large slot. Using a screwdriver remove the screw it should bring the rest of the mechanism with it.
3. This type of drain leaves only a small area for water and hair to escape. If there is a lot of hair this may be your clog.
4. After removing the hair reassemble the drain in the reverse order of taking it apart.
5. If this does not work go to overflow clog page___12___
13
Pipe Snake
A simple but messy job but it physically pushes the clog out. A small motorized unit works best but a hand held snake and a little elbow grease will work also.
1. If the drain is in a bathtub remove the cover plate and use that hole for the snake. Otherwise just go straight down the drain.
2. If there is no water standing in the drain, turn on the water until there is enough water standing so you will know when you clear the stoppage.
3. Without using the motor or spinning the snake by hand, push the cable down the drain as far as you can.
4. Sometimes a bouncing motion will help you through a turn. Just pull the cable out 4 or 5 inches and quickly push it back in.
5. Once you reach a point you can not pass begin to turn your snake by hand or motor until you get past the turn.
If this did not clear the clog then either your snake is not long enough to reach the clog or you may need to work the cable back and forth to break up the clog.
14
15
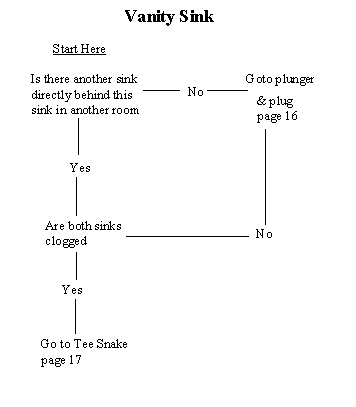
Plunger & Plug
Most vanity sink drains are very short and therefore easier to unclog. This is the simplest method for clearing the clog.
1. Fill the sink about half way with water.
2. Toward the front edge of the sink there is a hole that is to keep the sink from overflowing. Use a wet washcloth to tightly plug this hole.
3. Using a small plunger place the plunger over the drain hole. Rapidly push and pull the plunger while holding the rag tightly in the hole.
If this method does not work right away try it again, but if the clog is still there go to waste pipe clog on page 6.
16
Tee Snake
This is a little more advanced solution. The pipes under the sink will tie together in the wall. It is more difficult but it is not usually a very long pipe.
1. Bail out any standing water in the sink.
2. Make a drawing or take a picture of the pipe configuration under the sink.
3. With a bucket under it. Loosen the two nuts that hold the dip part of the trap in place.
4. Next remove the nut that holds the next piece of pipe toward the wall in place.
5. Using a flashlight look into the pipe and find where the tee that carries the waste from both sinks drains too and use a small hand snake to run down this pipe, usually no more than five feet.
6. Reassemble the parts under the sink just as you took them out with the dip of the trap going in last.
7. While checking for leaks underneath turn on the water and check the drain.
8. If this did not solve the problem go back to the chart on page one and go through it again.
17
Laundry Drain
The laundry drain is different than other drains there are only a few solutions to unclog them.
1. If there is no water standing in the drain, turn on the water until there is enough water standing so you will know when you clear the stoppage.
2. Without using the motor or spinning the snake by hand, push the cable down the drain as far as you can.
3. Sometimes a bouncing motion will help you through a turn. Just pull the cable out 4 or 5 inches and quickly push it back in.
4. Once you reach a point you can not pass begin to turn your snake by hand or motor until you get past the turn.
5. After about 6 feet down the line you have made it through the trap and if the line has not cleared the next step is the roof vent solution page 7.
18